Category Archives: Side Dish

DINNER ROLLS (Sandwich Buns, Snack Pizza Rounds)

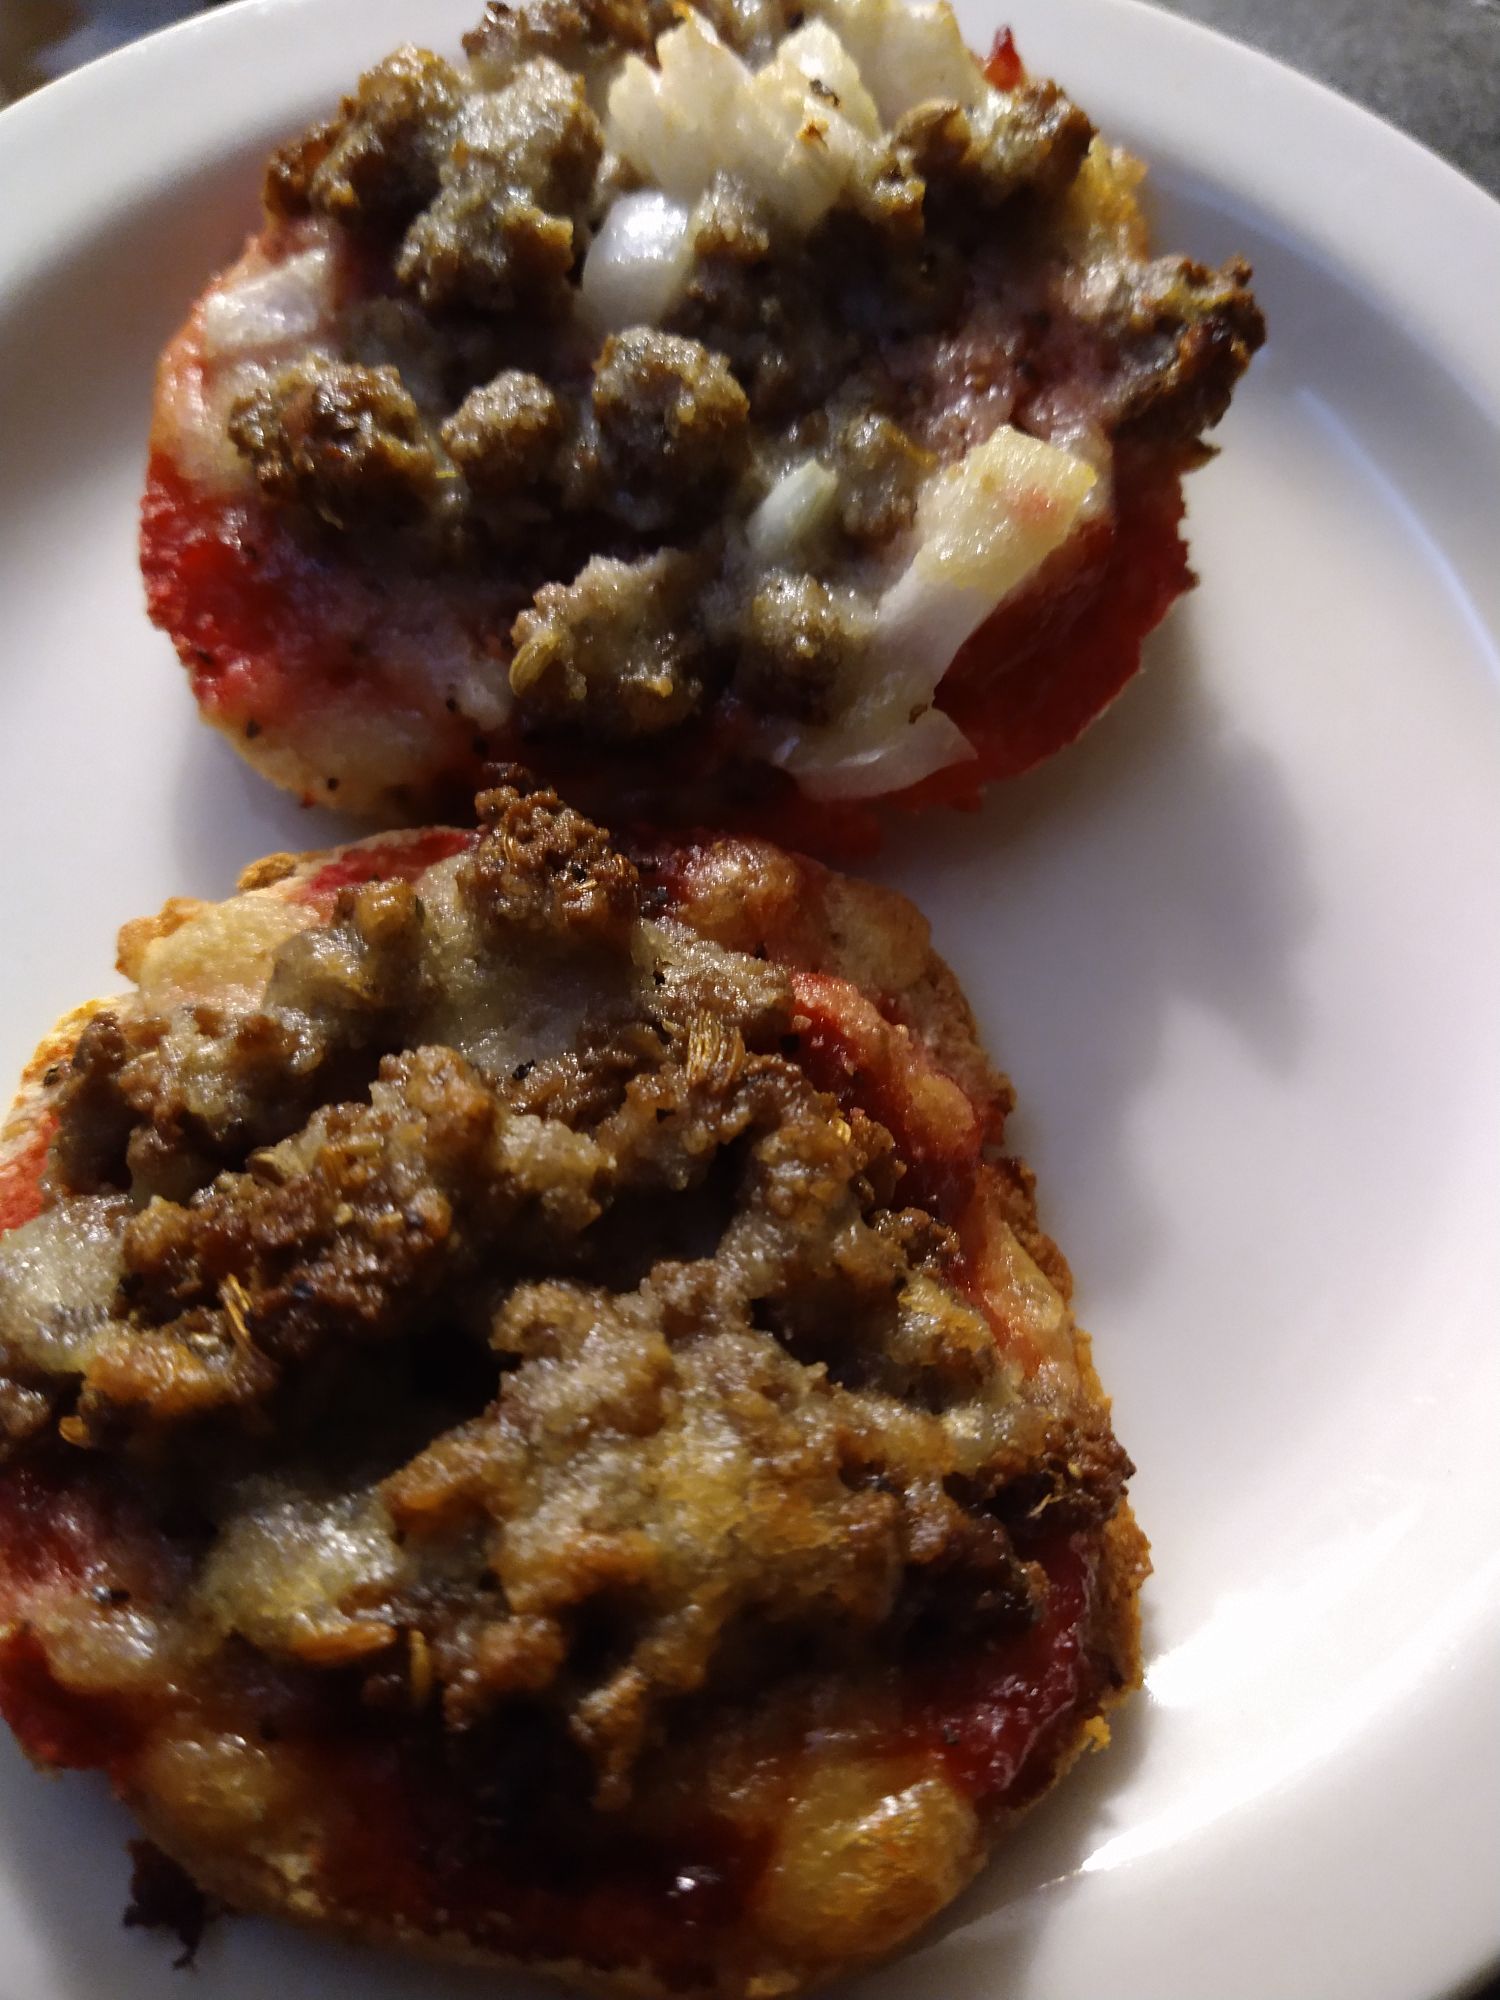
This recipe, depending upon how you shape it before baking (and adjust the baking time accordingly) works well for a number of “bread substitute” types of recipes or meal plans. You can use this, English muffin size, to make open-faced snack pizzas just as easily as you can eat it as it is, or turn it into the base of a breakfast sandwich with your favorite ingredients. I can be used for sloppy joe and/or biscuits with sausage and country gravy style of meal plans too. I’ve used it as a “burger bun” style of bread replacement when eating salmon burgers, turkey burgers, or beef burgers, as well as making a bun sandwich with it. It does okay, flavor wise, with either sweet (top with stevia sweetened cinnamon butter for example) or savory items. It freezes well. It tastes just fine by its self or with butter on it. (Try garlic bread, too–just remember it is soft and can easily crumble). I’ve not tried it yet for bread crumbs but I bet it could be crumbled and used as a base to make herb croutons, or a stuffing base with turkey broth onions celery and sage, and is basically a good go-to item to have on hand since it freezes so well. It can be made ahead and frozen. It thaws easily in the toaster oven in the amount of time it took me to make the meal I wanted to use it for. When I made “pizza” with it, I added it frozen to the baking tray, topped it with frozen sauce, and frozen homemade sausage, and the dairy-free cheese, and it worked well enough too.

INGREDIENTS:

  • 1/2 Cup HEB Unsweetened Coconut Yogurt
  • 1/2 Cup Coconut Flour
  • 1/2 Cup Boiling Water
  • 1 TBSP Psyllium Husk
  • 2 TBSP Golden Flaxseed Meal
  • 2 TBSP Melted Butter
  • 1 TBSP White Vinegar
  • 1 tsp baking powder
  • 1/2 tsp Real Salt
  • 1/4 tsp Arrowroot

INSTRUCTIONS:

You can find this recipe’s original author’s instructions to mix these and bake them here: Keto Vegetarian’s Recipe

I made modifications from the original recipe due to different allergens. One note is that the water should be boiling when it is used to activate the psyllium. Once mixed, the dough needs to rest for about 10 minutes. The oven should be preheated to 350 degrees. These are baked about 25 minutes (until golden on top). Turn off oven and let cool for 10 minutes before removing from the oven.

They do well: 1) frozen and thawed (I froze them flat on a tray, then transferred them to individually sealed bags with a piece of parchment paper between the split portion so as to be able to separate them before thawing more easily so i could thaw in the toaster oven. 2) can be used without any further work than making them. 3) do well from the fridge and being used.

They are too moist. Like many “coconut” based items these have a tendency to have a too moist texture. They do not hold up well to a burger and don’t toast firm enough, even in the toaster oven (but that’s better than not toasting them) to really not crumble when eating a juicy burger. I would suggest always using sandwich style lettuce in the bun if you are using them as a burger bun so it catches what ever you have inside (tuna salad, salmon beef or turkey burgers, chickpea/hummus spread, etc) when the bun eventually falls apart, as it likely will.

Recipes on this blog I recently used in combination with this dinner roll recipe to make various types of meal plans:

  1. Snack Pizza

  2. Salmon Patties
  3. Burger Patties
  4. Turkey Patties
  5. Sandwich
  6. Open face as a base for: sloppy joes, or sausage and country gravy.
  7. Just as is, or with butter, or toasted with butter or seasonings (garlic bread, cinnamon and stevia, etc).

Pickled Beets

So, if you’ve made nitrate-free corned beef (vegan or with any cut of beef meat) and decided to try the option using the water inside the canned beets, drained off, to make the corned beef portion more like the traditional red-color most corned beef (even vegan) are served looking like, you may now be wondering: What on earth do I do with a drained can of beets? You could add fresh water to a pan, heat them, and serve them along side another meal but you could also make PICKLED BEETS! YUM. Yum!

INGREDIENTS (SUGGESTED)

Consider all of the spices listed below as OPTIONAL. See one you hate? No worries, leave it out. See one you love which is missing? Again no worries, included it. Here is what you are going to need:

  • White Vinegar
  • Water
  • Pinch of one or more of the following: Salt
  • Nutmeg
  • Cinnamon
  • Allspice
  • Ginger
  • Black Pepper Corns or Powdered
  • Whole or ground Cloves (I put a LOT of these little beauties in mine!)
  • Molasses, Brown Sugar (swerve), Stevia Package, or a dash of Maple syrup.
  • OPTIONAL: Other spices as desired or none–use whole or fresh or ground

METHOD:

  1. Place the drained beets you used in making the nitrate-free corned beef (vegan or with any cut of beef meat) recipe into your canning size or recycled but clean jar.
  2. Use the jar to “measure” the amount of vinegar you need. Fill the jar of beets approximately 1/3 the way full of vinegar.
  3. Add enough water to top off to the headspace level in your jar you normally use. NOTE: The beets should not stick out of the jar or cross into the headspace. If they do, use a larger jar, or two jars, instead.
  4. Pour off the vinegar water into a sauce pan (don’t worry–it will be starting to turn PINK from the beets–that’s fine).
  5. Put in a dash of each of the spices you want to use. Taste. Adjust seasonings to your taste buds.
  6. Bring to a boil.
  7. Allow to cool enough to then safely pour over beets in prepared jar, allowing for the 1/4 inch headspace. Use a jar funnel. Tightly seal the lid. Shake the jar well to incorporate. Place in fridge for a minimum of 48 hours before testing for doneness.

SERVING SUGGESTIONS:

  • Enjoy as is, right out of the container!
  • Use as a side to your favorite meals
  • Snack on these.
  • Enjoy in a salad.
  • Use in any recipe or way you would use normal, high-sugar, pickled spiced beets.
  • Use as a topper in a wrap or for burgers. Give it a try on turkey burgers. Yum, yum!
  • Use it with any “lettuce” wrap filled with any ingredients.
  • Use as a soup garnish.

Did you think of any other use? Let me know in the comment below.

Coleslaw (Vegan, Egg Free)

How do you make coleslaw, or other mayo related items, when you cannot have eggs or nightshades? Hm! Most egg substitutes include some form of nightshade as part of the ingredients so…there is that. In comes coconut yogurt to the rescue?

INGREDIENTS:

  • Cabbage (green, white, savoy, asian, purple, red, or a “kit” of washed and shredded cabbage from the produce department–you name it, it is all good!)
  • 2 Baby Carrots
  • Unsweetened Coconut Yogurt
  • 1 TBSP Vinegar
  • 1 Package Sweet Leaf Stevia
  • 1/2 tsp (approximately) celery salt (adjust seasoning to your taste buds)

INSTRUCTIONS:

  1. Begin by shredding fresh, raw, cabbage and carrot, if desired; or use a coleslaw shredded cabbage base kit. Note: it doesn’t matter if you use one type of cabbage, both colors, asian cabbage or a packaged cabbage, we just need shredded cabbage. I used about 1 cup of shredded veggies for this slaw version.
  2. Set aside the veg until later.
  3. Begin mixing the coleslaw dressing ingredients. Taste and adjust as needed.
  4. Blend the dressing and the veggies together until well combined.
  5. Store in the fridge, covered, for 30 minutes or longer to allow the flavors to blend and meld together.

NOTE: This recipe also works well with broccoli and/or shaved brussles sprouts (do this yourself, or buy a “kit” of them in the grocery store produce aisle).

Dairy Free Sprinkle Cheese

This recipe produces a powder you can store in an air tight spice jar and sprinkle on foods as a topping, much like store-bought Parmesan cheese, but with out dairy or nightshades, which are common in other products.

Besides using this recipe as a sprinkle-on spice, you can also turn this recipe into a quick cheese sauce. To do so, simply add 4 TBSP of the powder to 4 TBSP of butter in a pan over medium heat. Then add cup of liquid (broth, water, “milk”, etc). This recipe easily scales up or down, as needed.

INGREDIENTS:

METHOD:

  1. Grind the thyme into smaller flakes or powder.
  2. Combine all of the ingredients together.
  3. Store in an air-tight container at room temperature. Consider adding to a well-labeled recycled spice jar with a tight-fitting lid, to use as a sprinkle on topping over favorite foods.
Pictured is a quick, go-to, freezer meal including: 7-Spice meat balls, zucchini, 2 TBS Faux Tomato Pasta Sauce, steamed until fork tender sprinkled with salt, pepper, and sprinkle cheese sauce for a quick meal.

CREAMY SAUCE INSTRUCTIONS:

To make a cheese-like sauce, you will need to add to a sauce pan over medium heat 4 TBSP of the “cheese sauce” powder mix, 4 TBSP of butter. Allow this to cook until fragrant and all of the butter is melted and mixed well into the “sauce” mix like you would to make any traditional Roux gravy. Once the roux is fragrant, add 1 cup of liquid. For the liquid pick what ever makes sense for the use you are making the sauce. If you want creamy mac-n-cheese style sauce, consider using a plant based milk. If you want to flavor it with meat or veg, consider using bone broth or veggie broth. If you are short on time or don’t have any thing else on hand in your pantry, use water. It is still good!

The creamy sauce pairs nicely with so many things! You can use it as a cheese sauce for dipping veggies and crackers into. You can use it as a salad dressing for taco salad. You can pair it with poultry, beef, or sausage. You can use up left over veggies such as cauliflower or broccoli or other yum veg with this sauce. It pairs really nice too with home made sausage. And one of my favorites is cauliflower or broccoli rice! YUM!

To turn left over veg, such as cauliflower rice, into the most delicious cauliflower rice you’ve ever tasted follow these steps: start with cold, refrigerated left over cauliflower rice (or other cold, left over veggies–if your veggies are too large, don’t worry, you can “chop” them into the sauce to smaller, bite-sized, pieces to amalgamate the flavors and different veggies into a flavorful way to eat up left overs). Make up the Creamy Sauce as instructed above, toss in the left over veggies, blend and serve. This makes a nice lunch, too, if you have too little of a portion of left over (meat) added to the dish to use everything up. Serve while hot and enjoy.

Left over broccoli “riced” with this cheese sauce served with onion style “noodles” and beef patty.

VEGAN: This recipe is very easy to turn into a vegan recipe. Simply swap out “butter” for vegan butter or a neutral flavor oil when making the sauce use a plant-based milk or water.

RESULT: This is a basic go-to recipe which I’ve re-made many times since first giving it a try. One note: it is claimed by other health care experts that fortified nutritional yeast vs unfortified, natural, nutritional yeast makes a big difference in health; however, as I’ve not studied it out for myself and the only brand of nutritional yeast available to me in my local market is not fortified, but naturally rich in nutrients, I didn’t bother to research this topic out–but if your nutritional yeast is fortified, you may want to do so before using it in this quantity, especially if you have people in your life who are allergic to several things, have autoimmune, or other health issues already.

Herbed Pilaf (Keto Style)

Tasty. Simple. Nice “side”.

INGREDIENTS:

  • 1 TBSP minced red, green onion, or fresh shallot
  • 1-3 garlic cloves (peeled and minced; i used one)
  • 1 TBSP butter (or olive oil for vegan)
  • 1/4 tsp Italian Seasoning
  • 2/3 cup hemp hearts
  • 2 TBSP water, bone broth, or veggie broth
  • 1 1/3 tsp fresh parsley chopped

METHOD:

  1. Dice garlic cloves and red onion. Set aside.
  2. Add butter to non-stick skillet over medium heat.
  3. Saute onion 1-2 minutes in butter.
  4. Add garlic and Italian seasoning. Saute 30 seconds longer. This should be really fragrant now! Yum Yum!
  5. Add hemp seeds. Stir well to mix in the seasonings.
  6. Add brother (or water). Continue to cook, while stirring, until the brother (or water) has evaporated and the hemp heart seeds are fluffing up/drying out. This takes about 7 minutes.
  7. Add 3 teaspoons of parsley and transfer to serving bowl. Top with remaining parsley as a garnish.

TIPS:

  • This works just great as is. There are things which can be done to modify its flavor to your personal preferences, or meal plan.
  • Pairs lovely with fish, or any protein. Pairs nicely with many different veggie sides.
  • May be a nice replacement for rice, for those not into cauliflower rice.

Serving Size: 1/3 cup each. Makes 2 servings.

SOURCE: I found this recipe on many pinterest and blogs; however, most people claim it was originally from the Atkins website. I did indeed find a version of it there which looks pretty similar. My personal twist is the water. I tested this recipe using water, instead of opening up and/or making broth for such a small quantity and it worked just fine with water instead of the more nutritious broth. The Atkins website also has a feature by which this recipe can easily be scaled to feed more people than 2 servings, as the version I found and made is only for 2 people. That seemed about right. It turned out about 3 to 3.5 servings with a protein and veggie side served along with this.

Carrot Fries

This is a simple to make, tasty snack or nice side to a meal.

INGREDIENTS:

  • 1 pound organic carrots
  • 2 TBSP Olive Oil
  • 2 TBSP Tapioca Flour
  • 1 tsp salt
  • 1/2 tsp black pepper
  • 1/2 tsp onion powder
  • 1/2 tsp garlic powder
  • 1/2 tsp dried thyme

METHOD:

  1. Preheat the oven to 450 degrees.
  2. Prep a baking sheet with either a silicone mat, or parchment paper liner. Set aside.
  3. Wash carrots, scrubbing the exterior to remove any dirt or blemishes. Peeling is not necessary.
  4. Cut into shoestring or matchstick sized pieces. Try to cut the pieces to approximately the same time so they finish cooking at similar times.
  5. Coat cut carrot “fries” with all of the remaining ingredients. Mix well to ensure everything is coated well and well mixed in.
  6. Spread the carrot fries on your prepared pan in a single layer without any overlap.
  7. Bake until the fries are at the desired texture. Turn at about 1/2 way so both sides crisp up.

YIELD: 4 servings. According to the CM app, each1/4 lb serving has 120 calories and 11 net carbs.

NOTES:

  • These amazingly do not taste like carrots!
  • They are a great side dish of their own.
  • They taste better than sweet potato fries.
  • Baking time may vary on the size of your carrot slices, as well as oven differences. Watch closely.
  • These are good on their own, or with any of your favorite dip or condiments.
  • I served these along size a classic burger, and zucchini salad.

Savory Crackers

This recipe is a trial of turning various recipes I’ve viewed online into an allergen-friendly recipe based on the allergens I’m making meals and meal plans around based on the folks in my life who have various allergies and sensitivities.

INGREDIENTS:

  • 1 cup freshly GROUND sunflower seeds.
  • 4 tsp nutritional yeast
  • 2 tsp psyllium husk powder
  • 1.5 tsp italian seasoning powder
  • 1 tsp salt
  • 1 tsp garlic powder
  • 1 tsp onion powder
  • 1/4 cup boiling filtered water

METHOD:

  1. Begin by measuring all of the dry ingredients into an appropriate sized bowl.
  2. Mix together dry ingredients well.
  3. Add boiling water.
  4. Mix together well to incorporate all dry ingredients into water. Press together until it forms into a dough ball (it may be a bit sticky–that’s okay)
  5. Allow “dough” to rest for a few minutes.
  6. Place dough ball on baking tray between either two pieces of parchment paper or two silicone baking mats. Roll out thin. Now you can leave it whole and bake it that way (watch closely this is going to require longer baking by a few minutes), score it to break easily, or cut it into bite sized crackers. Any method works great depending on how you are going to use it later.
  7. Bake until desired done in a 350 F degree toaster oven. Cooking time may vary on each batch.

NOTES:

  • Add color: parsley flakes, mustard or turmeric powder, beet or spinach water (left over from cooking and draining a colored veg) or never mind the fact they look ugly–they taste fabulous! With the fresh nutritional yeast combined with the other herbs and spices this tastes like Italian Parmesan something–not quite the texture of breadsticks but not bad either.
  • Watch the salt. It can taste too salty. So adjust to your likely and purpose. This is okay as is, but I would tweak the salt down (or leave it out all together) for some uses.
  • Serving suggestions: with dip: Don’t pre-cut or score the dough prior to baking. Instead bread into dippers and serve on your snack boards with dip. as a chip: simply enjoy as you would chips or crackers on the side with favorite go-alongs or alone, as is. as a snack: spread with jam, preserves, butter, a compound butter, or top with dairy-free cheese or fish/salmon/sardine/ or plant-based “spreads” atop such as pesto or olive tapenade.

Cauliflower Snack

Take a raw, full head or packaged, organic or home-grown cauliflower, add a delicious home-made Dairy-Free cheese sauce and viola! You’ve got a great chip and dip substitute which is satisfying, healthy, allergen friendly when everyone else is enjoying other snacks which aren’t allergen friendly, or when you are in the mood for something crunchy! While this combo is my personal favorite, other great dippable combos include carrots, crackers, broccoli, green onions, radishes, cucumbers, celery, and anything you can think of as a dippable.

Star Fruit

Information

Recently, I gave star fruit a try. There are many ways you can prepare it from raw, to cooked, to juicing it into a favorite beverage. The flavor of this unusual fruit is not as pronounced as it unique shape or juiciness. It tastes “familiar” and yet isn’t.

Worth the click-thru to view information about its nutritional benefits, as well as risks to those taking certain medications or with kidney issues.

Health Benefits, Risks, and Studies: https://www.healthline.com/nutrition/star-fruit-101

RECIPE:

I took 1 store-purchased star fruit and washed it. Next, I thinly sliced it and removed any visible seeds. Next, I sampled a small piece of it, raw before proceeding to lay out the rest of the cut slices on a silicone mat. Then I baked it for 15 minutes in a 400 degree oven. Some of the slices were still moist and others were crispy. The crispby ones tasted a bit like browned potato chips!

Shortcake (Coconut Flour)

This recipe is grain-free, low carb, can be made sugar free, quick and easy to whip up and is delicious! Eat it plain, as is, or served with your favorite berries or berry sauce atop, with or without whipped cream. Another serving suggestion is with chocolate sauce and whipped cream. Enjoy!

INGREDIENTS:

  • 1/4 Cup coconut flour
  • 3 TBSP melted butter, coconut oil, or other neutral oil
  • 1/3 Cup JUST eggs vegan liquid egg replacement
  • 3 TBSP sweetener (or about 6 stevia packs)
  • 1/4 tsp rum
  • 1/4 tsp cinnamon powder
  • 1/4 tsp salt
  • 1/4 tsp baking powder

METHOD:

  1. Turn on your toaster oven (If using) to 400 degrees.
  2. Meanwhile prepare a 6 muffin tin with muffin liners (or grease with butter, coconut oil, or other neutral-flavored oil)
  3. Begin by mixing together in a bowl all of the dry ingredients. Make sure the mixture is well combined and none of the dry ingredients have lumps.
  4. Stir in the melted butter or oil, as well as the liquid JUSTeggs brand egg replacement.
  5. Mix well to combine.
  6. Drop by heaping TBSP into prepared muffin tins. Distribute batter evenly between 6 muffin tins. Batter rises, but it doesn’t spread much, so spread it out evenly in the muffin tin before baking.
  7. Bake until golden about 10-15 minutes depending on your toaster oven.

Various Serving Suggestions:

  • This recipe yields 6 small shortbread portions. Those individual portions can be slit in half to stuff with , or top with, fruit of choice and cool whip/whipped cream. It makes a nice snack or dessert.
  • Leave out the rum, cinnamon powder and sweetener; use olive oil in place of butter or coconut oil for a savory flavor. Pairs nicely with garlic or Italian seasonings.
  • For portion control, you could bake for a shorter time, 12 mini muffins instead of 6 regular muffins.
  • As is, this recipe tastes great as a short cake (with any fruit/juice and whipped cream).
  • Top with cream cheese.
  • Other topping ideas, besides fruit include just using whipped cream. And/or adding chocolate bits. Walmart carries a sugar free brand of chocolate bits. Or, you can make your own.
  • Taste great at room temperature with some butter on it.
  • Try it with sugar-free jelly or jam.
  • This recipe is surprisingly quick and easy to make, with very little clean up. You can make it frequently.

Source: For this recipe, I looked at high carb recipes, gluten free recipes, and other online recipes which were similar to this one. Then I made up a hybrid type recipe without any of the allergens the folks I’m cooking for avoid.